
[the_ad id=”651″]
Bismillahirrahmanirrahiim … This time Detriamelia.com will discuss the GIS Tutorial with LeafletJs equipped with a modification of popups and markers on the map with leaflets. Perhaps many don’t know the technique for making the easiest map with the js leaflet. For that I will explain a little what LeafletJS.
[the_ad id=”632″]
About LeafletJS
LeafletJS is a javascript library for creating maps (GIS) that are mobile friendly and have a very small size of only 38 KB. With a very small library size, of course it is very powerful for today’s class of map libraries. Leaflet itself is very rich in features including being able to run well on all platforms such as desktop or mobile. Plus, Leaflet has an Open Source license so we can use it without paying a penny. Incredible isn’t it …: D
For more details, please visit the official website here. Immediately, this time I will help you all to implement LeafletJS in map making, and then I will also help to add markers at certain coordinates and of course it is equipped with custom popups so that they look more beautiful and professional.
Please follow my tutorial below:
GIS Tutorial with Leafletjs (Popup and Marker Modifications)
First you have to download the js leaflet library by clicking the following link: Download Library LeafletJS, then please extract it and add it to your gis project folder.
After that make the index.html file, please copy the following syntax:
|
1 2 3 4 5 6 7 8 9 10 11 12 13 14 15 16 17 18 19 20 21 22 23 24 |
<!DOCTYPE html> <html lang="en"> <head> <meta charset="utf-8"> <meta name="viewport" content="width=device-width, initial-scale=1, shrink-to-fit=no"> <meta name="description" content="Tutorial GIS Dengan Leafletjs (Modifikasi Popup dan Marker)"> <meta name="author" content="Detri Amelia Chandara"> <meta name="generator" content="Jekyll v3.8.5"> <title>Tutorial GIS Dengan Leafletjs (Modifikasi Popup dan Marker)</title> <link rel='stylesheet' href='./assets/css/leaflet.css'> <link rel="stylesheet" href="./assets/css/style.css"> <link rel="stylesheet" href="fontawesome/styles.min.css"> <link rel="stylesheet" href="https://stackpath.bootstrapcdn.com/bootstrap/4.3.1/css/bootstrap.min.css" integrity="sha384-ggOyR0iXCbMQv3Xipma34MD+dH/1fQ784/j6cY/iJTQUOhcWr7x9JvoRxT2MZw1T" crossorigin="anonymous"> </head> <body class="p-0"> <!-- partial:index.partial.html --> <div class="containerxx"> <div class='custom-popup' id="map"></div> </div> <!-- partial --> <script src='./assets/js/leaflet.js'></script> <script src="./assets/js/script.js"></script> </body> </html> |
id = “map” is to indicate the parameters that the map will display here. Then please create a file with the name script.js and save it to the assets/js/ folder and add the following syntax:
|
1 2 3 4 5 6 |
var map = L.map('map', { closePopupOnClick: false }).setView([0.433084, 101.4133345], 15); L.tileLayer('https://{s}.tile.openstreetmap.org/{z}/{x}/{y}.png', { attribution: '© <a href="http://osm.org/copyright">OpenStreetMap</a> contributors' }).addTo(map); |
0.433084, 101.4133345 is the position of the coordinates displayed first on the map, while ‘15‘ is the zoom setting of the map. Please set yourself. L.tilelayer is the process of adding map base layers. If I use a base map from openstreeetmap. Please adjust yourself if you want to use another map base.
Then we will add a marker to the map. Let’s add the custom marker settings first. Please copy the following syntax and paste it directly below the syntax above:
|
1 2 3 4 5 |
var DetriIcon = L.icon({ iconUrl: './assets/images/home.svg', iconSize: [38, 38], // size of the icon popupAnchor: [0, -15] }); |
Please adjust ./assets/images/home.svg with your own marker image. Or you may download an image that I have provided in the download link below. Next we add the Custom Popup settings. Please copy the following syntax right below the syntax above:
|
1 2 3 4 5 6 7 |
var customPopup = "<center><b style='color:yellow'>DETRI AMELIA CHANDRA</b><br>Jl. Rowo Bening, Perum. Tiga Putri Tahap III<div class='waseman'><a href='https://facebook.com/idet.ambun' target='_blank' class='facebook' style='color:#fff;'><i class='fa fa-facebook'></i></a> <a href='https://twitter.com/detriamelia' target='_blank' class='twitter' style='color:#fff;'><i class='fa fa-twitter'></i></a> <a href='https://www.instagram.com/detriamelia/' target='_blank' class='instagram' style='color:#fff;'><i class='fa fa-instagram'></i></a> <a href='https://web.telegram.org/#/im?p=u687504930_6230769115732589639' class='telegram' style='color:#fff;'><i class='fa fa-whatsapp'></i></a></div></center>"; var customOptions = { 'maxWidth': '500', 'className': 'custom', closeButton: false, autoClose: false } |
I enable this custom popup to display my home address and social media links. Of course this custom popup can be modified according to our wishes with formal html.
Next we apply markers and popups to our map by adding the following script just below the syntax above:
[the_ad id=”632″]
|
1 2 3 |
L.marker([0.43324, 101.4143517], { icon: DetriIcon }).bindPopup(customPopup, customOptions).addTo(map); |
For the complete script, please see the following script:
|
1 2 3 4 5 6 7 8 9 10 11 12 13 14 15 16 17 18 19 20 21 22 23 |
var map = L.map('map', { closePopupOnClick: false }).setView([0.433084, 101.4133345], 15); L.tileLayer('https://{s}.tile.openstreetmap.org/{z}/{x}/{y}.png', { attribution: '© <a href="http://osm.org/copyright">OpenStreetMap</a> contributors' }).addTo(map); var DetriIcon = L.icon({ iconUrl: './assets/images/home.svg', iconSize: [38, 38], // size of the icon popupAnchor: [0, -15] }); // create popup contents var customPopup = "<center><b style='color:yellow'>DETRI AMELIA CHANDRA</b><br>Jl. Rowo Bening, Perum. Tiga Putri Tahap III<div class='waseman'><a href='https://facebook.com/idet.ambun' target='_blank' class='facebook' style='color:#fff;'><i class='fa fa-facebook'></i></a> <a href='https://twitter.com/detriamelia' target='_blank' class='twitter' style='color:#fff;'><i class='fa fa-twitter'></i></a> <a href='https://www.instagram.com/detriamelia/' target='_blank' class='instagram' style='color:#fff;'><i class='fa fa-instagram'></i></a> <a href='https://web.telegram.org/#/im?p=u687504930_6230769115732589639' class='telegram' style='color:#fff;'><i class='fa fa-whatsapp'></i></a></div></center>"; // specify popup options var customOptions = { 'maxWidth': '500', 'className': 'custom', closeButton: false, autoClose: false } L.marker([0.43324, 101.4143517], { icon: DetriIcon }).bindPopup(customPopup, customOptions).addTo(map); |
If it’s finished, please save.
Then for the final step, create a style.css file and save it to the folat assets/css/ and add the following syntax to it:
|
1 2 3 4 5 6 7 8 9 10 11 12 13 14 15 16 17 18 19 20 21 22 23 24 25 26 27 28 29 30 31 32 33 34 35 36 37 38 39 40 41 42 43 44 45 46 47 48 49 50 51 52 53 54 55 56 57 58 59 60 |
html, body { height: 100%; margin: 0px; } .containerxx { height: 100%; background: #f0e68c; } #map { width: 100%; height: 100%; } .custom-popup .leaflet-popup-content-wrapper { background: #2c3e50; color: #fff; font-size: 16px; line-height: 24px; border-radius: 0px; } .custom-popup .leaflet-popup-content-wrapper a { color: rgba(255, 255, 255, 0.1); } .custom-popup .leaflet-popup-tip-container { width: 30px; height: 15px; } .custom-popup .leaflet-popup-tip { background: transparent; border: none; box-shadow: none; } /* css to customize Leaflet default styles */ .custom .leaflet-popup-tip, .custom .leaflet-popup-content-wrapper { background: #0b3654; color: #ffffff; } .waseman { text-align: center; padding: 10px 0; } .facebook, .twitter, .instagram, .telegram { padding: 10px 15px; background: #555956; text-decoration: none; text-transform: uppercase; font-size: 10px; color: white; border-radius: 3px; } .facebook:hover, .twitter:hover, .instagram:hover, .telegram:hover { background: #c97d18; } |
NEW UPDATE!
To make this map view more better, lets add “Street View” button to make user able to access via google map. See the example below :
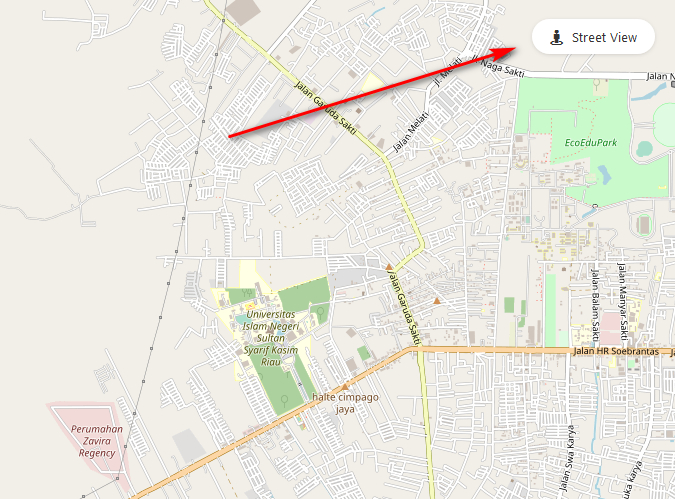
Just add the script below after <div class=’custom-popup’ id=”map”></div> :
|
1 |
<a href="https://www.google.com/maps/search/?api=1&query=0.433267,101.415001" id="streetView" target="_blank">Street View</a> |
Dont forget to change 0.433267,101.415001 with your lat,lng. Next step is, add the css code below between <head> and </head> syntax :
|
1 2 3 4 5 6 7 |
<style> #streetView,#mapnav-buttons a{color:#333;background-color:#fff;padding:7px 18px;padding-top:7px;font-weight:500;-webkit-transition:all .2s ease-in-out;-moz-transition:all .2s ease-in-out;-o-transition:all .2s ease-in-out;-transition:all .2s ease-in-out;box-sizing:border-box;display:inline-block;border-radius:50px;box-shadow:0 1px 4px -1px rgba(0,0,0,.2);text-decoration:none;} #streetView:hover, #mapnav-buttons a:hover{background-color:red;color:#fff} #streetView{position:absolute;top:20px;right:20px;z-index:999;font-size:13px;line-height:21px} #streetView:before{content:"\e015";font-family:simple-line-icons;position:relative;top:2px;margin:0 6px 0 0;font-size:15px;line-height:1px} #streetView:before{content:"\f21d";font-family:fontawesome;font-size:16px;top:1px;margin-right:8px} </style> |
Please save. And check whether it works or not. You will see “Street View” button on right top. To see the demo and download the application that I made, please click the link below:
[the_ad id=”651″]
Alhamdulillah … Finally, the article about GIS Tutorial With Leafletjs (Modified Popups and Markers) was finished. Hopefully this article adds insight and is useful for all of us. If you have questions or doubts, don’t be shy to ask questions by adding comments. 🙂


Assalamualaikum ka, arikelnya sangat membantu. Boleh request nggak ka? bagaimana cara integrasi ke databasenya.. menampilkan marker berdasarkan data di database.. terimakasih ka sebelumnya.
Waalaikumsalam… terimakasih sudah berkunjung… ok, ntar dibuat artikel cara integrasi ke database…
Assalamualaikum ka, arikelnya sangat membantu. Boleh request nggak ka? bagaimana cara integrasi ke databasenya.. menampilkan marker berdasarkan data di database.. terimakasih ka sebelumnya.
Assalamu’alaikum wr wb mba’ gimana nampilin street view kaya di demo? terima kasih….
Waalaikumsalam… 0oo iya saya terlupa… silahkan ikuti petunjuknya di paling bawah artikel yaa.. sudah saya update. Terimakasih sudah berkunjung dan menginfokan kekurangannya…
Trims a lot mba’….
sama2… senang bisa membantu…
Terima Kasih tutorialnya. Menambah ilmu baru. Apakah ada cara integrasi ke database (mysql) untuk menampilkan latitude dan logitude nya?
InsyaAllah nanti akan saya siapkan tutorial integrasi ke databasenya…. terimakasih masukannya.
Terima Kasih tutorialnya. Menambah ilmu baru. Apakah ada cara integrasi ke database (mysql) untuk menampilkan latitude dan logitude nya?
InsyaAllah nanti akan saya siapkan tutorial integrasi ke databasenya…. terimakasih masukannya.
Assalamualaikum ka,artikelnya sangat membantu…
kebetulan saya pakai bahasa php dalam penggunaannya,untuk menambahkan satuan di belakang nilai pop up bagaimana ya?terimakasih
Waalaikumsalam… saya kurang mengerti pertanyaannya. Satuan di belakang nilai pop up maksudnya bagaimana?
Assalamualaikum ka,artikelnya sangat membantu…
kebetulan saya pakai bahasa php dalam penggunaannya,untuk menambahkan satuan di belakang nilai pop up bagaimana ya?terimakasih
Waalaikumsalam… saya kurang mengerti pertanyaannya. Satuan di belakang nilai pop up maksudnya bagaimana?
assalamualaikum kk, artikel nya bagus, tp link download source code nya gk fingsi kk, makasih
assalamualaikum kk, artikel nya bagus, tp link download source code nya gk fingsi kk, makasih
I do not even understand how I finished up right here, but I thought this put up was good.
I don’t know who you’re however definitely you’re going to a famous blogger if you happen to aren’t already.
Cheers!
Assalamualaikum ka… Demonya sudah tdak aktif lagi…